Page 13 - Pressure Calibration Brochure
P. 13
721 PCRAELISBSRUARTEOR
F1 F2 F3 ZERO
7.21psi
mAV
2M340AmVXA
COM
TECH
TIPS
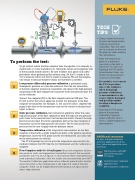
Pump
720TRD
RTD Probe
Close Close
valves
valves
• Always center the vernier
of your hand pump before
starting any pressure
calibration. This will allow
you to increase or decrease
Fluid stream
Fluid stream
the pressure when making
ine adjustments.
• Store the temperature
To perform the test:
probe in a protective
case such as the built in
To get started, isolate the low computer from the pipeline. It is normally in-
slot of the 721 soft case.
stalled with a 5 valve manifold. If so, closing the valves on the pipeline side Exposing the RTD probe
of the manifold should isolate it. Be sure to follow local policy and safety
to mechanical stress can
procedures when performing this isolation step. Set the P1 sensor of the reduce the measurement
721 to measure inH20 and the P2 sensor to measure PSI and the tempera-
accuracy of the probe.
ture sensor to measure degrees Celsius or Fahrenheit as needed.
• Be careful to not connect
STEP Low pressure differential pressure calibration is performed using the P1 low pressure
1
atmospheric pressure as a low side reference. Vent the low connection
side of the calibrator
of the low computer or pressure transmitter and connect the high pressure when doing high
connection of the low computer or transmitter to the low pressure port (P1) pressure calibrations
on the calibrator.
or measurement or the
Connect the computer (PC) to the low computer serial or USB port. The
sensor will be damaged
and possibly rupture
PC will instruct the user to apply one or more test pressures to the low
computer or transmitter. For example, 0, 100 and 200 inH20. Squeeze the creating a dangerous
pump to get close to the test pressure and use the vernier or ine pressure condition.
adjust to dial in.
• Inserting the RTD probe
STEP Static pressure calibration will normally be applied to either the same
prior to the pressure
2
high pressure port of the low computer or both the high and low pressure calibrations typically
ports. Refer to the manufacturer’s instructions for details. Connect the high allows suficient time to
pressure sensor input (P2) to the appropriate port on the low computer or reach a stable temperature
transmitter and to the high pressure test source. The PC will instruct the measurement.
pressures for the user to apply from the pressure source.
STEP Temperature calibration of the temperature measurement on the low
3
computer is done with a single temperature point at the pipeline operating
temperature. Insert the RTD probe into the test thermowell and allow time Additional resources
for the measurement to stabilize.
For more in depth information
The PC will prompt the user to enter the temperature measured by the
about this application check out
calibrator. Remove the RTD from the test thermowell and the calibration is these videos and application notes
complete.
from Fluke.
STEP Flow Computers with 4 to 20 mA inputs: Many low computers utilize a
4 HART pressure and HART
low pressure, static and temperature transmitter to convert the measured
smart RTD transmitter
parameters into 4 to 20 mA signals. In this instance these transmitters may 754 videos
need individual calibration if the test results are not satisfactory (see HART
Transmitter Calibration application note or video for more details). Another Custody Transfer calibration
source for errors in this coniguration is the input A/D cards of the low application note
computer. These can be independently tested using a mA signal source HART transmitter calibration
from a loop calibrator.
13