Page 11 - Pressure Calibration Brochure
P. 11
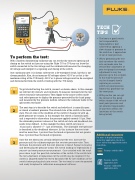
Pressure Module
TECH


TIPS
Hand
Pump

• The key to a good switch
Pressure Input
test is repeatability.
Repeatability is best

achieved by applying a
slow change in pressure to

the switch as it approaches
its set or reset pressure.
To perform the test:
• When performing the test
With a modern documenting calibrator you can test for dry contacts opening and
ind out where the switch
sets and make sure the closing on the switch or if you are using the Fluke 753 or 754 you can leave the
switch connected to the live voltage and the calibrator will measure the changing
vernier/ine adjustment of
your test pump has enough AC voltage and interpret it as opening and closing of the switch.

adjustment to vary the One cautionary note: it is always safer to test a de-energized circuit, but this is not
pressure up to the set point.
always possible. Also, do not measure AC voltages above 300 V ac as that is the
In this way the pressure maximum rating of the 75X family. 480 V ac 3-phase voltages must be de-energized
can be changed slowly
and disconnected from the switch if testing with the 75X family.
capturing an accurate
switch set point pressure.

Repeat this procedure for STEP To get started testing the switch, connect as shown above. In this example
the reset point.
1
we will test dry contacts and continuity. To measure continuity for the test
• With practice you can get select resistance measurement. Then toggle to the source screen mode

the vernier of the pump and select pressure to display the pressure generated by the hand pump
within range of the set and and measured by the pressure module. Advance the calibrator mode to the

reset point pressure and split screen test mode.

get excellent repeatability STEP The next step is to describe the switch and whether it is normally open
of your tests (within the
2 or closed at ambient pressure. The relaxed state of the switch is the reset
limitations of the switch state. The set state is the condition of the switch it changes to with ap-
being tested).
plied pressure or vacuum. In this example the switch is normally open
and is expected to close when the pressure applied exceeds 10 psi. Next

the allowable pressure variance of the switch set state and deadband size
needs to be deined. In this example the ideal switch set value is

10 psi and is allowed +/- 1 psi of deviation. The allowable reset pressure
is described in the deadband tolerance. In this instance the reset state

must be more than 1 psi less than the found set pressure but not greater
Additional resources
than 3 psi less than the found set pressure.
For more in depth information
about this application check out STEP Once the test tolerances are fully deined start the test. Increase the
3
these videos and application notes pressure until the calibrator captures the set state pressure value. Then
from Fluke.
decrease the pressure until the reset pressure is found. Repeat increasing

and decreasing the pressure across the switch looking for repeatability in
Pressure switch video
your set and reset pressure measurements. Once satisied with the result

press done to get the pass/fail evaluation of the switch. If the switch fails
the test adjustment or replacement of the switch may be required. If the

switch is adjusted repeat the test to document the As-Left condition of the
Pressure switch switch before putting back into service. The test result is now documented
application note
and ready for upload to calibration management software.
Pressure calibration
application note


11